Upgrading to or installing Windows 10
revised May 2022

Upgrading from Windows 7 or Windows 8 to Windows 10 is free and easy. The upgrade process typically takes 1-4 hours. The computer is unusable for about half of this time.
The latest version of Windows 10 was released in May 2019. After the upgrade, you will need to re-install Windows games, re-set up the shares, remove unneeded start items like OneDrive, and remove unneeded icons from the taskbar. You can force the computer to upgrade at your convenience by going to this web page
Pre-installed Windows 10 configuration Why upgrade? Can I upgrade? Avoiding Windows 10
Preparing for upgrade Setting up a brand-new computer Perform the upgrade Important steps Optional steps PowerPoint
Pre-installed Windows
10
Do you have a brand new computer with Windows 10 pre-installed?
Skip to the relevant section.
Why upgrade?
Microsoft will stop supporting older versions of Windows at some point
in the future, so you will no longer be able to get security updates.
Google has already stopped issuing security updates for Google Chrome in spring 2016 for
users of Windows XP and Windows Vista. Firefox is still being supported
for Windows XP for now, but this will stop soon. Microsoft will stop
issuing security updates for Windows 7 as of December 2019. Software makers
have started to write
programs that will only work on Windows 10. Windows 10 has some nice
new features such as improved backup/recovery, security, file rollback,
improved multimedia, faster boot, Cortana digital assistant with voice search
(similar to Siri), and faster device recognition. Windows 10 boots much
faster and detects new hardware more quickly and reliably than older versions.
It also has enhanced security features.
Upgrading puts a lot of wear and tear on the machine, so if you have an older
computer (desktop more than 6 years old, laptop more than 3 years old), the
computer may fail during (or shortly after) the upgrade. For machines this
age, replacement makes more sense than upgrading, or just keep using it until it
fails. Of course, back up your data! If you need instructions for
backing up, read my Backup Bible.
Windows 10 has some drawbacks. The chief problems are:
1) Compatibility with older scanners and cameras
2) Every six months, it does a major update which can
take as long as two hours, during which time your computer is not usable.
It does not warn you when this will happen. This major update resets
sharing options and deletes games (Solitaire, Minesweeper, etc.) and resets
certain other settings. You can block this major update easily if you are
connecting to the internet with WiFi by
telling the computer that all your WiFi connections are metered.
3) Compatibility with older versions of AutoCAD,
Quicken, QuickBooks, and some other software. The software may not run, or
it may crash constantly.
4) Pop-up nag screens. They can be turned off
from Control Panel/ General / Notifications.
5) Issues with some older video cards. If you
have an older video card (older than Intel 965 chip), you should disable
automatic driver updates. I have a library of drivers for older video
cards. Email me if you
need these drivers, or visit the website of the video card manufacturer.
Check if you can upgrade to Windows 10
To perform a normal upgrade, the processor (Intel or AMD) must support PAE, NX
and SSE2, and the video card must support Direct-X 9 with a WDDM 1.0 driver.
On a desktop computer, you can upgrade the graphics card if that is the only
item preventing you from upgrading.
Note that there are ways to install Windows 10 on most computers that aren't
smart enough because it is missing one of these features. It's a simple
procedure for people who are tech-savvy. Create a GenuineTicket from your
existing activated Windows installation or have your Windows 7/8/8.1 CD key
handy. Then remove the drive from the
system or image the drive, in case the Windows 10
installation fails. Now insert a cloned drive running Windows 10 (from a computer that DOES meet the specifications) into the computer that does not meet specifications. Load all
your drivers, then reboot and copy the GenuineTicket onto the hard drive,
following the clean install instructions. Or open the Windows activation
screen and type in your Windows CD key. Note that if the cloned drive is
64-bit, the computer must be capable of supporting a 64-bit operating system.
Note also that a GenuineTicket for Windows 7 Home or Windows 8 Home can only be
used to activate the Home or Standard versions of Windows 10, and will not
activate the Pro version, and vice-versa. Note that you can only get a
valid Genuine Ticket on a computer with an activated copy of Windows 7, 8 or 8.1
and with the most important drivers loaded. You must have LAN or WLAN
drivers loaded, and often the video drivers to get the Genuine Ticket.
You may want to read HowToGeek's explanation of the upgrade process.
1. Almost all computers still running these days are capable of handling Windows 10. A few older computers that came pre-installed with Window XP or Windows Vista may not be smart enough to run Windows 10. You need a minimum of 2 GB of RAM to run, but it will run slowly unless you have at least 3 GB of RAM.
2. You can force the computer to upgrade to Windows 10 by going to this web page The download is 2-4 GB and will take at least 15 minutes, sometimes several days, depending on the speed of your internet connection. Alternatively, you can do a clean install. Here are instructions for doing a clean install. If you want to do a clean install, first create your GenuineTicket from the clean install instructions. Then download the Windows 10 Media Creation Tool. from the blue link "Download tool now" on this page. Then clone the disk from a computer that DOES meet the specifications and insert this cloned drive into the computer that does not meet specifications. Load all your drivers, then reboot and copy the GenuineTicket onto the hard drive, following the clean install instructions. If you do a clean install, I highly recommend using a local login instead of a Microsoft login. You can also upgrade directly here.

3. If you are running Windows 8 or 8.1, skip to step 7. If you are
running Windows 7, check compatibility of your hardware and software by running the
Upgrade Assistant from Microsoft. The upgrade assistant takes around
10 minutes on most systems to generate a compatibility report.
Note that the purpose of this Upgrade Assistant is only to identify possible
problems. Do not use it to upgrade from Windows 7 to Windows 8.
Instead, you will upgrade directly from Windows 7 to Windows 10.
Note that the Windows Upgrade Assistant is overly conservative. It may say
that a certain program or piece of hardware won't work, when it really will
work. Check the website of the company that made the hardware or software
to see if it really will (or won't) work.
4. Make sure your printer, scanner and camera are Windows 10 compatible. Check vendor websites.
5. Make sure all your software is Windows 10 compatible. The most common problems are with older versions of QuickBooks and Quicken. You may need to buy newer versions.
Check vendor websites.
6. You may need to un-install and re-install your scanner. Don't
worry if you can't find the disk. You can download the install files from
the manufacturer's website, under "Support and Drivers". If this is too
much trouble, don't upgrade.
7. Run a complete virus scan on your computer. You probably already
have a virus protection program installed. The most common ones are
McAfee, Norton, AVG, Windows Defender, and Microsoft Security Essentials.
If you can't figure out how to run your virus protection program, skip ahead to
the next step.
8.
I suggest you make a Genuine Ticket with your serial number activation
information in case the upgrade fails. Download this ticket-making file (32-bit version
or 64-bit version) and run it. It will create a file called
GenuineTicket.xml (in the same location where the ticket-making file is
located). Copy GenuineTicket.xml onto a flash drive. After
installing Windows 10, if Windows does not automatically activate, copy the file
GenuineTicket.xml from the flash drive into the hidden folder
c:\ProgramData\Microsoft\Windows\ClipSVC\GenuineTicket,
reboot, then activate Windows.
Avoiding the Windows 10 upgrade
If you can't, or don't want to upgrade, you can get rid of the upgrade nag
screen by adding two entries to your registry. Download
this file, unzip it, and run it.
When it asks if you really want to edit the registry, tell it "yes".
If you do not feel comfortable editing the registry, you can download and run
the GWX Control Panel which
will handle the edit for you.
Prepare for the Windows 10 upgrade
1. BACK UP DATA. Back up all your data onto a removable drive
or the cloud. Instructions are
here.
2. DELETE TEMPORARY FILES. Run a disk cleanup and delete temporary
files that you don’t need, using these
instructions.
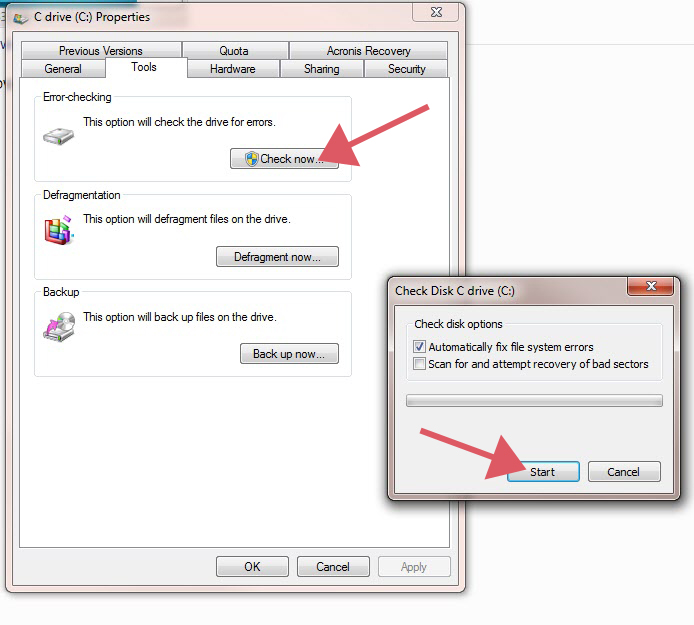
3. CHECK DISK FOR ERRORS. Make sure the file structure of the hard drive is okay by running CHKDSK. Follow these
instructions
and take the defaults. You do not need to check the box to scan for bad sectors.
4. BACK UP ENTIRE SYSTEM. Do a full system image backup onto a removable drive.
If the Windows 10 upgrade fails, you can fall back to this Windows 7 (or Windows
8) installation that you are currently using.
Instructions are
here.
5. MICROSOFT OFFICE KEY. Locate your installation key for Microsoft Office (Word, Excel,
PowerPoint) since you may need to reactivate Office after the upgrade. If
you bought the disk, look on the packaging. If you downloaded it from
Amazon, you can get the key by logging back into your Amazon account and
clicking on My Account / Your Games and Software Library.
6. PRINTERS AND SCANNERS. Almost all printers will
continue to print after the upgrade. Some older scanners and
multi-function printers will need a different interface for scanning after the
upgrade. If your printer is more than 5-6 years old, consult the support
website for the printer manufacturer for more information.
7. CLEAN INSTALL. If your computer has viruses or is running slowly, you may prefer to do
a clean install of Windows. This means having to re-install all your
software and printers, and you will lose any data you have not backed up.
If you do not want to do a clean install, skip to the next step. For a
clean install, you will need a Windows 10 install disk or complete set of files,
plus a legal key for Windows 10.
(Keys for Windows 7 and Windows 8 will no longer work. Do a clean
install of Windows 10. Now right-click on This PC and select Properties.
Scroll down and click where it says to Activate Windows.
There are very detailed instructions on
this page including links for the ISO files you will need. These ISOs
are likely not for the most current version. Download the latest version
here .
Perform the upgrade
1. If you are using a laptop computer, make sure it is plugged in to
electricity so it won't run out of juice partway through the installation.
2.
Go here to download Windows 10, or run the installer directly without
downloading the ISO installer. You can use the download tool to copy
the files onto a flash drive or DVD if you need to download on one computer to
install on a different computer, or if you will be upgrading multiple computers.
3. If you are doing a clone install, clean install, are using the Windows
10 Media Creation tool, or have been suppressing recommended updates for several
months, when you are prompted, tell it to not download the updates now, but
instead wait until after the upgrade to Windows 10 is complete before
downloading updates. Otherwise, this upgrade process may hang while it
looks for dozens of updates.
4. Remember, you will need to activate Windows 10. This will happen
automatically if you have a legal copy of Windows 7 or Windows 8, or if your
computer previously had a legal registered copy of Windows 10. If you have no internet access, you
can activate Windows 10 using a smartphone or using the browser on any computer that is
connected to the internet. Visit
this website
for Microsoft activation self-service for mobile and follow the
instructions to activate.
Setting up a brand-new computer (skip this step if you
are upgrading)
When you turn on the brand-new computer, you will need to select your language, country and keyboard. Do NOT connect to the internet when prompted. Instead, set up the computer with a local login FIRST, and then connect to the internet. If you connect to the internet right away, on the newest versions of Windows, it will force you to use a Microsoft login instead of a local login. Make sure to write down yourusername and password so you don't lose them. I do NOT recommend using a PIN instead since this can create problems. When the computer prompts to connect to the internet, click in the lower left corner "I do not have internet." On the following page, it will nag you and say that you won't have full functionality without internet. This is a lie. Continue without internet, create your local login, and THEN connect to the internet.
Important post-installation tasks
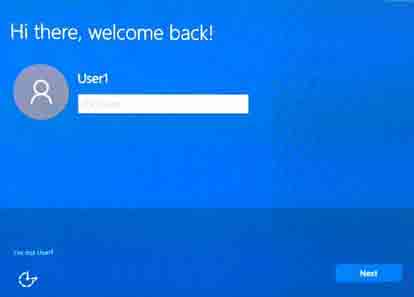
1. After the upgrade, it will say, “Welcome back –username-", Or on
a brand-new Windows computer, it will welcome ask you to set up your country,
language and keyboard, and then will tell you to connect to the internet. If you are upgrading, skip to step 2 since you already
have a login account.
I strongly recommend setting up with a local account, not a
Microsoft account. When it asks for a Microsoft login, tell it you don't
have one and want to skip the step of creating a Microsoft account. (For
the newest versions of Windows 10, the only way to avoid being forced to use a
Microsoft login is to NOT be connected to the internet during setup.) Some
versions of Windows 10 Pro will ask if you are setting up an account for personal or business use (domain)
- if it does, then
tell it you have a business use, even if that's not accurate. Having
a local login makes recovery and debugging much easier. People who use
Windows Live Mail or have a Windows smartphone or tablet may actually want to
use a Microsoft account. For the vast majority of other users, a local
account makes more sense. Once you have created your local or Microsoft
account, continue to the next steps.
Read
more about the relative pros and cons of the two.
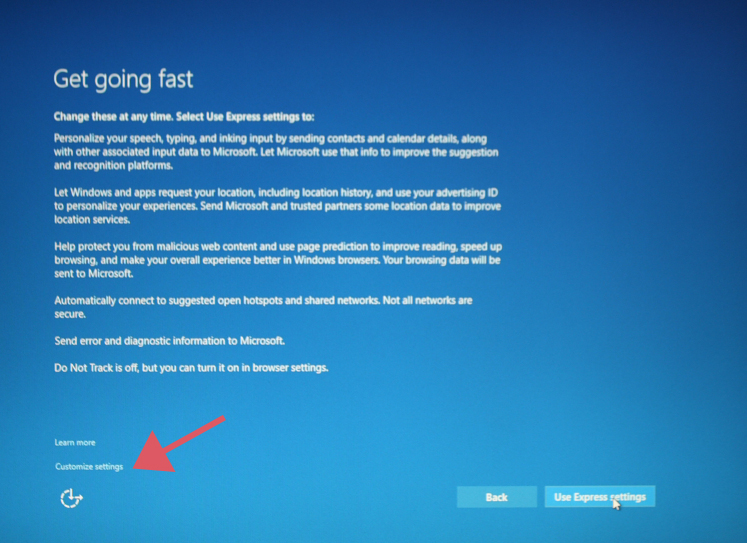
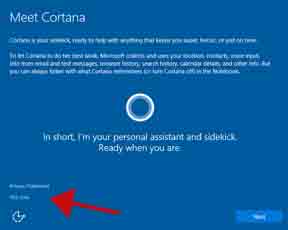
2. You want to turn off all the security holes and nag screens. If
you see the
following screen,
click on the teeny letters in the lower
left corner to customize. Do NOT take the express settings since they pose
security risks. If you do not see this screen, move to the next parargaph.
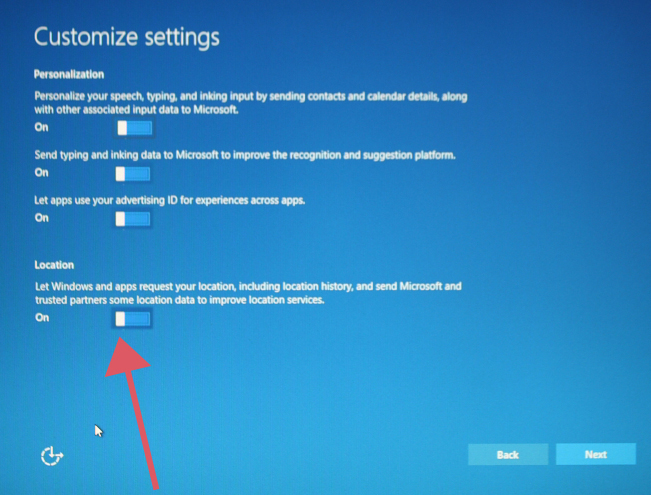
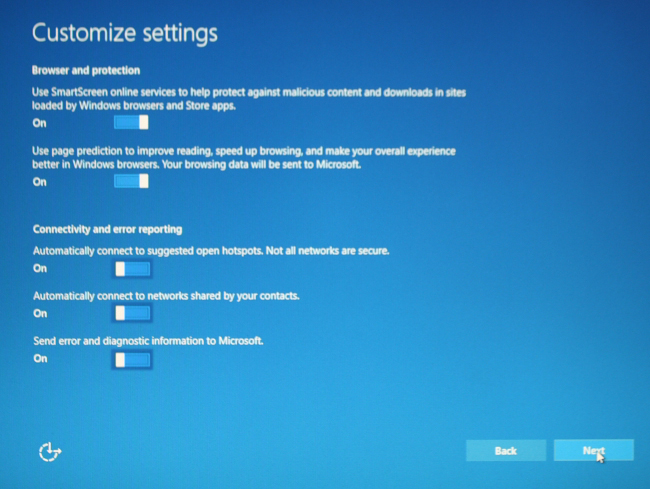
Move the slider to the left to turn OFF all the
options on all the pages, except don't change the settings for SmartScreen or
page prediction (if it asks you these questions), and you probably want Location
information shared, so Google will show you hits that are near your real
locattion. SmartScreen will alert you (sometimes) if you attempt to
visit a website that is infected with malware. Page prediction attempts to
complete web addresses that you type, which most people find helpful.
Disable Cortana or tell it to set up Cortana later, which wants to read your email and track everything you do on
the computer so it can "help" you.
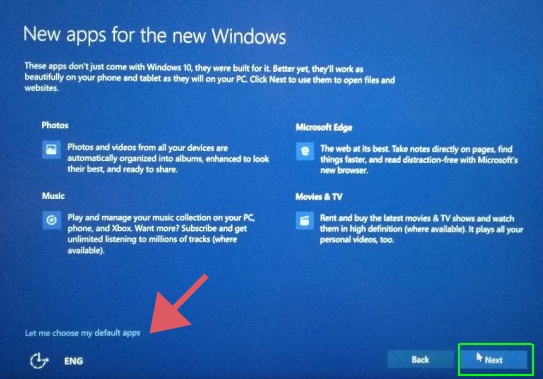
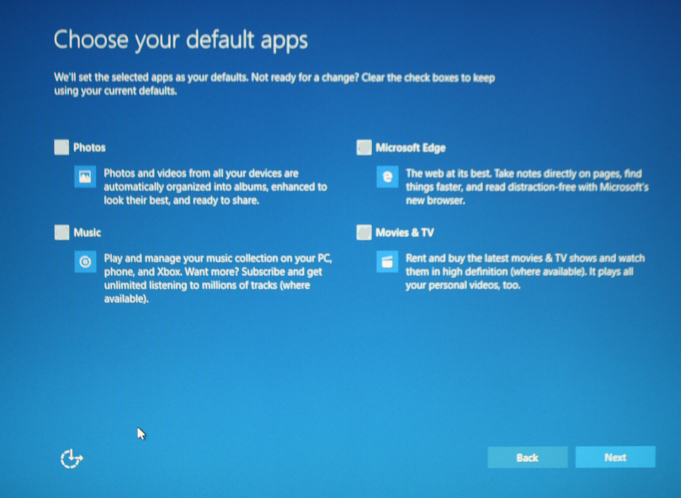
If you see this screen,
where it says default programs, find the teeny letters to customize and un-check
all the boxes. It is VERY important to un-check the box for Microsoft
Edge, since otherwise it will try to take over your computer.
If you forgot to change these settings, you can fix them later. See step 8
below.
3. DRIVER UPDATES. Windows 10 wants to be helpful and automatically update your device drivers. Some of these updates can result in no video, no printing, or a non-bootable computer. I suggest you turn these off. Open an elevated command prompt then type SYSDM.CPL. Then click on the Hardware tab. Click on Device Installation Settings, then click on NO to turn these updates off. You may also want to use one of these tools to hide or block future updates. The Microsoft tool is used to block a failed update from trying again. MajorGeeks has a tool for preventing future updates and comes in 32-bit and 64-bit versions.
15.
SAFE MODE Enable Safe mode during boot to help
you recover from a possible virus infestation or bad video driver.
Under Windows 10, by default you cannot use F8 during
boot to enter safe mode. To enable safe mode,
open an elevated command prompt and type in the following three lines, one
at a time.
(note that the last line may give an error message because it may already be
enabled.)
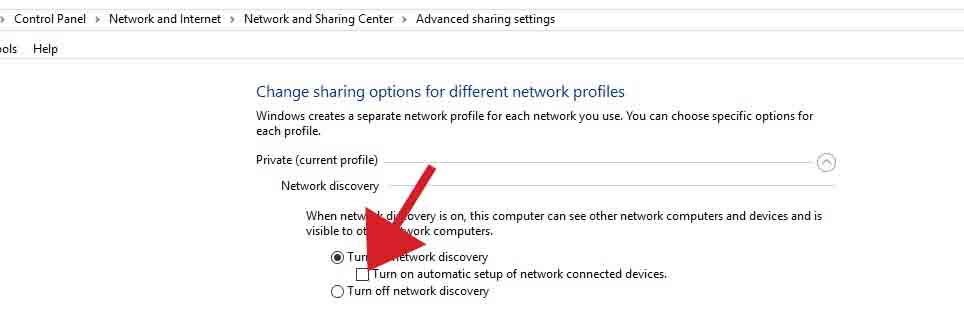
4. DEVICE DISCOVERY. Turn off automatic installation of
network devices to prevent having duplicate printers and other duplicate
devices. In the Network and Sharing Center, un-check the box for automatic
setup of network connected devices See screenshot below. Do this
because some of the automatic Windows updates may cause some of your devices to
work, or your display to stop functioning.
5. UPDATE. Run a Windows update.
Click on Start / PC settings / Updates, then click on the box Check for Updates. Restart when prompted and then check for updates a second time.
Repeat until there are no more updates. You can do the other items on this
list while the updates are running, if you want to save time. If you
connect to the internet wirelessly, you can disable automatic updates by
designating your WiFi connection as a metered connection using
these instructions. If you don't want to be disrupted by having your
computer become unusable for two hours when Microsoft rolls out a major update
and if you are running the Professional version of Windows 10, you can postpone
these major upgrades using
these instructions or these
other instructions. Note that you will need to run these upgrades, but
do them at a time that YOU choose, rather than having Microsoft pick a day to
disrupt your business. You can force an update directly to the 21H1
version of Windows 10 by running this
file.
5. INSTALL PRINTERS. Turn on the printers, scanners and cameras that you use with the computer. You may see a green progress bar at the bottom center of the
screen while they install. If you see this, patiently wait until they complete. Then check to see if they have installed. If your printer
and scanner do not install automatically, run the installation programs from the CD or download the installer from the manufacturer's website,
under their Support section. Check that you can print and can import pictures from your camera.
You may need to download new drivers for some of these devices from the vendor website if they won't work.
5. PRINTERS. Turn
on the printers, scanners and cameras that you use with the computer, one at a
time. You may see a green progress bar at the bottom center of the screen while
they install. If you see this, patiently wait until they complete. Then check
to see if they have installed. If your printer and scanner do not install
automatically, run the installation programs from the CD or download the
installer from the manufacturer's website, under their Support section. Check
that you can print and can import pictures from your camera. You may need to
download new drivers for some of these devices from the vendor website if they
won't work. Check that the correct printer is selected
as the default.
7. SCANNER. If you use a scanner, check to make sure you can scan a document.
If it doesn't work, you will need to uninstall all the software that came with
the scanner, reboot, download the latest version of the scanner software/drivers
from the manufacturer's website, reboot, then test the scanner again.
8. PDF reader. Make sure Adobe Acrobat Reader is set as your default PDF reader, not
Microsoft Edge. To do this, search on Default Programs and select the
blue-and-white gear labeled Default Programs. Scroll to the bottom and
click on Choose default apps by file type. Wait a bit for the list to fill
up. Scroll down to .pdf in alphabetical order. Look to see which app
is listed next to .pdf. If it is Adobe Acrobat Reader, you are OK.
If it's anything else, click on the icon to the right and change it to Adobe
Acrobat Reader. While you are in Default Programs, go to Choose default by
apps and select Google Chrome on the left column. On the right, tell it to
take all the defaults for Chrome.
9. MICROSOFT OFFICE. Make sure that Microsoft Office (Word, Excel, PowerPoint) works if you
have it installed. It may prompt you to re-activate. Try to activate
over the internet. If it won't let you, and you need to activate by phone,
do not speak into the phone. Instead, use the touch-tone keypad on the
phone to enter your answers. Enter "1" for everything except enter "2"
when it asks if you want to activate by smartphone. Enter the digits you
see on the activation screen on the phone keypad when prompted.
10. SECURITY SETTINGS. If you didn't fix the security settings during setup (pictures above),
you can fix them now. Instructions are
here.
11. FILE SHARING. If you are accessing shared files or folders with
other computers on your home or work network, the Windows 10 upgrade process
will screw up the sharing settings. Fix them by doing the following:
In the lower right corner of your screen (called the system tray, or
notification area), find the network icon and right-click on it. Select
Network and sharing center. When this opens, on the left, click on Change
advanced sharing settings. Turn on network discovery, turn on file
sharing, turn on public sharing, and turn off password protected sharing.
12. EMERGENCY REPAIR DISK. Make a Windows 10 repair CD or repair USB flash drive.
Here are
instructions for making a bootable USB recovery flash drive. If your
flash drive is smaller than 16 GB, you will not be able to copy the system
files, but will get just the basic files onto the recovery drive. If your computer is
too old to boot from a flash drive, you will need to download and burn a Windows
10 repair disk, which come in 64-bit and 32-bit flavors. You can download the
32-bit version or the
64-bit version of the ISO repair disk
image.
If you need help figuring out which version of Windows 10 you have,
Microsoft's website
will automatically detect it for you - scroll down to where it says Automatic
version detection results. These files are about 400K in size. Once downloaded, use a DVD burning program
to burn the ISO image onto a blank DVD disk. Burning instructions
for Windows 10 are
here. If you already have a disk with the Windows 10 full installer on
it, you can use that disk instead to do the repair. You can download ISO
images of the full install disks using the links below. Each file is about
3 GB in size, so be patient while they download.
Windows
10 Home 32-bit Windows
10 Home 64-bit (Professional versions will be uploaded soon)
13. SYSTEM BACKUP. Do a full system image backup onto a removable hard drive.
Instructions are
here and at the end it will prompt you to make a Windows 10 repair disk.
Hopefully, you already made one on the previous step. If not, make one now and keep it handy. Murphy’s law says if you have it, you’ll never need it.!
Remember to store this removable hard drive off-site, such as in your safe
deposit box. That way, if your office or house burns down or is
burglarized, all your information will be safe. For further information on
backup, visit my Backup Bible.
14. CORTANA.
Cortana is Microsoft's digital assistant, modeled on Siri or OK
Google.
If you didn't already do it,
turn Cortana off so it doesn't collect personal data about you.
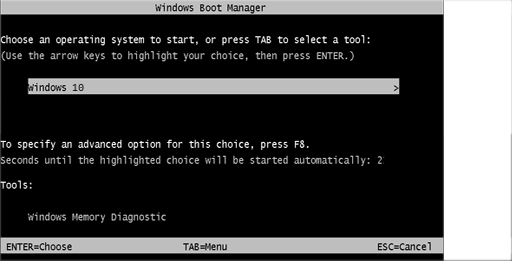
bcdedit /set {bootmgr} displaybootmenu yes
bcdedit /timeout 3
bcdedit /set {default} bootmenupolicy legacy
Each time you turn on the computer, it will cause
a black screen to flash momentarily(see
screen shot at right). If you ever need to get into safe
mode for debugging, you can hit F8 during this momentary black screen . If
you change your mind and want to get rid of this black screen, type the following
command from an elevated command prompt.
bcdedit /timeout 0
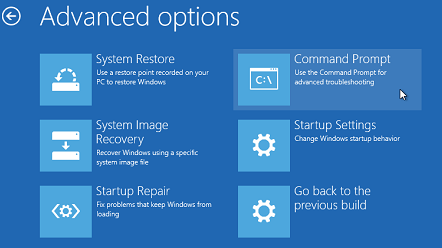
If you are already in Windows and want to reboot into Safe Mode, hold down the
Shift key while clicking on Restart. This will bring up a menu of Advanced
Options (see screenshot below left) where you can select Startup Settings to reboot to Safe Mode, among
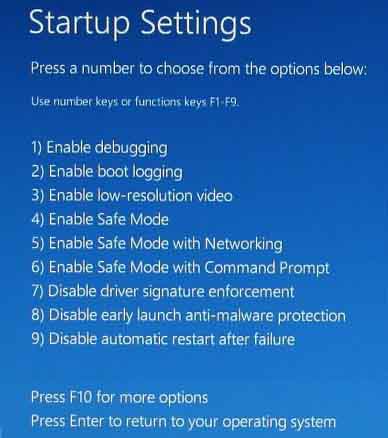
other choices. When you reboot, you will get the menu of Startup Settings
(screenshot below right).
Type in the number of the option you want (usually Safe Mode with Networking).
Note that everything in this section works with Windows 8 and 8.1 in addition to
Windows 10
OPTIONAL CUSTOMIZATION
1. START BUTTON. If you want your Start Button back, you can use Classic Start or
Stardock Start 10.
You can visit
www.ninite.com and install Classic Start (at
the bottom of the Utilities list) for free. Stardock
Start 10 costs $4.99.
If you want the colorful orb back instead of the plain Windows10 icon for the
start button, download this graphic
file, then right-click on the start button and select Customize. Fill
in the radio button to change the icon, then browse to where you have saved the
graphic. note that the items on the Start button are divided into
two groups - the Programs are your Windows 7 applications, while Apps lists the
new Windows 10 programs which most people prefer not to use.
2. NECESSARY PROGRAMS. If you don't already have Adobe Reader and Google Chrome, I strongly
recommend installing them. Here are links to install
Google Chrome and
Adobe Reader. On the Adobe
Reader installation page, make sure to un-check the box under Optional Offers so
you don't get unwanted junk. Adobe Reader is used for reading PDF files,
commonly used for government and corporate forms, and for scanned documents.
Google Chrome is the most popular browser in the world, used for accessing the
internet. Google Chrome works much better than Internet Explorer, Mozilla
Firefox, or Safari. Even if you already have Adobe Reader, install the
latest version. This will make Adobe Reader the default PDF reader, and it
is vastly superior to the one built into Windows 10.
3. DEFAULT PROGAMS You can set the
default programs by searching on Default Apps (Creators Edition) or Default
Programs (earlier editions) OR go into Default App Settings (use the search box
- it will work the second time or type this on the command line: control
/name Microsoft.DefaultPrograms then click on Set your default
programs). Scroll to the very bottom where it says Set defaults by app and
click on it. Click on Adobe Reader and Manage - make it be default for
everything that it is capable of opening. Then go back to the alphabetical
list, select Google Chrome, and have it be the default for everything except
Acrobat/PDF files. They will work much better than Microsoft Edge, which
is the built-in default for all these items.
4. SHOW DESKTOP. You may want to add an icon for Show Desktop to the taskbar since Windows 10
has only an almost-invisible rectangle in the lower-right corner to perform this
function. You may also want a Shut Down computer icon on your taskbar. Most
people hate the lock screen. To solve these three problems, download
this file onto your desktop and unzip
it into a folder on your desktop. Run the NoLockScreen program, then you
can delete that icon. For the other two icons, ShutDown and ShowDesktop,
right-click on each one, then select Pin to Taskbar. Then you can delete
the entire folder Windows10addons.
5. SAFE MODE. If
you have not already enabled booting to Safe Mode when there is a problem, go
back up a page or two to item #15 and enable it now.
If you don't do this, and the computer won't boot, it will be much more
difficult to recover from the problem.
6. INTERNET EXPLORER. You may want to add an icon for Internet Explorer which is now hidden.
To add this, open This PC or File Explorer. Navigate to the C drive, then
Program Files (x86), then Internet Explorer, then use the right button to right
drop-and-drag iexplore to your desktop. When you release the right mouse
button, select Create shortcut here. Rename the shortcut Internet
Explorer. However, I strongly recommend using Chrome wherever possible.
Some websites will only work on Internet Explorer.
7. GAMES. Windows 10 has eliminated the games
Solitaire, FreeCell, Minesweeper, etc. There are two options for getting
them back. Either option will create a folder called Games that is visible
from the Windows 7 start menu. If you didn't already install the Classic
Shell, visit step 1 on this optional list to get the start menu back. You
will need to re-install the games each time there is a major update to Windows
10.
Download an
installer but make sure at the end of the installation to un-check the box
for the WinAero malware that they try to foist on you.
8. ONE DRIVE. Windows 10 comes with built-in Microsoft OneDrive, which is a cloud
storage system that competes with Google Drive and Dropbox. Very few
people actually use it, so you will probably want to turn it off. Look in
the lower right corner of the screen, called the system tray, down by the clock.
Click on the up-arrow to the left of the tiny icons to view all the system tray
icons. One of them looks like three little attached clouds. This is OneDrive.
Right-click on it and select Settings. Go to the top left of the new
window, to Settings and un-check the box to start automatically. Close
this box. Now return to the system tray and right-click on OneDrive again,
and select Exit. Now it will no longer run each time you turn on the
computer. If you want to completely remove it, follow
these instructions.
9. JUMP LISTS. If you need your Jump Lists back, to easily open the most-recently
used documents in Word, Adobe Reader, Excel, etc. do this: Find the icon
for the program on your desktop, right-click on it, and select Pin to Start
Menu.
10. DISK CLEANUP. Once you are certain that Windows 10 is running OK, if you need to free up
space on your hard drive, run Disk
Cleanup again and get rid of the Windows.old folder. Instructions are
here.
I recommend running the Disk Cleanup twice a year to remove unnecessary clutter.
From a command prompt, type cleanmgr.exe
11. ADDITIONAL USERS.
If you add additional users, I highly recommend creating local accounts
rather than using a Microsoft login. When it asks for their email address,
click where it says you do not have this information, then Skip the creation of
a Microsoft account.
12. ACTION CENTER POP-UPS.
In the lower right corner of the screen, you will get occasional
pop-ups to alert you to updates or problems. If you are giving a
PowerPoint presentation or don't want these pop-ups,
turn on Quiet Hours to suppress them during normal working hours, or kill
the notifications entirely. To kill all or just a few, got to PC
Settings / System / Notifications and set the sliders to Off.

13. POSTPONING UPGRADES.
Windows 10 does massive upgrades about twice a year that will make your
computer unusable for about two hours. As of mid-July 2016, they don't ask for
permission or when is a convenient time to schedule these upgrades. If you
don't want to be surprised during a day when you really need your computer, and
if you are running the Professional version of Windows 10, read
this article to learn how to postpone (but not prevent) these upgrades.
You can prevent upgrades and prevent automatic updates by running the Task
Scheduler and going to Microsoft/Windows/Windows Updates and disabling all
listed items. For each item, right-click to disable it. To run the
Task Scheduler, from a command prompt, type taskschd.msc
14. CONTROL PANELS. There are two control panels in Windows 10. The old Windows 7
control panel is still called Control Panel. But many of the settings have
moved to the Windows 10 control panel which has been renamed PC Settings.
You can get to PC Settings easily. To get to the Windows 7 Control Panel,
either install Classic Start or add an icon to the desktop for the Control
Panel. To add the icon, right-click on the blank space on the desktop and select
Personalize. On the left side, click on Themes, then select Desktop Icons.
Check the box for Control Panel and you may want to check additional boxes to
get additional icons.
15. BACKGROUND COLOR.
To customize the background color, type the following from a command
prompt.
control /name Microsoft.Personalization /page pageWallpaper
16. SCROLL BARS. Want the scroll bars to always
show up at the right side of the screen? Go to Settings / Ease of Access /
Display and adjust the slider that says Automatically hide scroll bars in
Windows.
*************************************************************
A
PowerPoint summary of
this page is available for download. Note that it does not get updated,
and contains only a fraction of the information on this page.
Additional information about Windows 10 is available on Tom's Hardware page,
accessible here.
You can also read Microsoft's
tutorial on upgrading to Windows 10, but do NOT take all the default
settings that they recommend.
For specific questions, contact Sue Kayton,
the Computer Doctor www.suekayton.com